
Facebook’s Conversions API (CAPI) and How to implement it with your Shopify site
To say the least, 2020 has been an unpredictable year, especially for the digital ad buying space. This year we saw one of the biggest booms in Facebook advertising history followed by platform instability coupled with consumer uncertainty, and most recently news that Apple’s iOS14 will give users more security control (we believe this is a good thing) mainly through preventing advertisers from being able to track off-platform actions across the web via third-party browser cookies. Firefox has also begun increasing its security and has begun allowing users to block similar cookies, and Google intends to completely remove the ability to use them by 2022.
This is a devastating blow for social advertising platforms as they depend heavily on first- and third-party cookies to be able to attribute purchases made on advertisers’ sites to the ads served on their platforms. Let's dive in shall we?
What is it?
Conversions API (CAPI) is a revamping of what Facebook previously called Server Side API (SSAPI). Server Side API has been around for a while and was a code-heavy option that allowed brands to create custom actions/events that could then be passed from a site’s server to Facebook for attribution.
What does it do?
Conversions API builds on the benefits of SSAPI while adding new integrations and partner apps to simplify the installation process. It is intended to improve the overall data that is being sent from your site to Facebook to provide better insights and learnings of your campaigns.
Why does it matter?
For example: we already know that there are ad blockers that block Facebook ads from being able to attribute sales to the ads being served to a user. We know that over the next two years the ability to effectively attribute these actions is going to diminish as browsers begin to phase out first- and third-party cookies. However, while ad blockers (and browsers) block cookie data from being passed on the browser side, they do not have a way of blocking the data that is passed on the server side. So it will only become more valuable in time to be passing this data from your server.
What makes it useful?
The most useful cases for implementing CAPI will be the opportunity to improve the quality of your data and ad performance overall. Facebook now states that the ROI of implementing CAPI is a 150% improvement in comparison to campaigns that only convert for traffic (clicks), which will eventually be an ad buyer’s only option without the implementation of CAPI. That said, we are currently seeing about a 25-35% increase in attribution performance based on accounts that only had the browser pixel placed and have now moved over to implementing CAPI.
Another thing that will make it more useful is the ability to customize specific events on your site along with being able to better incorporate offline conversions into your data mix. So for example, if you are running lead generation ads, but want to make sure a sales person has verified that they lead is of quality, you can customize CAPI to delay that lead event from being passed to FB until a sales person has noted or checked the lead in your CRM. This, in turn, would allow you to optimize ads on only the leads of quality and not based on all leads generated. (To be fair, this example is also one that needs a custom Dev solution and is not yet available with most app or the Shopify integration).
Does Conversions API rely on the Pixel or is it independent of the pixel?
CAPI is independent of the FB pixel but for right now it is best advised to use CAPI in tandem with the browser based pixel to send the same conversion events (e.g., ‘purchase’ or ‘subscribe’) as well as any additional post-conversion events that are not able to be sent via the FB pixel (Like the ‘qualified leads’ example we mention above). Keep in mind that a redundant setup requires event deduplication. This is automatic with the Shopify implementation but will need to be custom coded in all other implementations.
So how do you implement CAPI?
There are 3 different ways to begin the implementation process. You can identify which fits you best based on the following:
If you have Shopify, you can take action and set CAPI up now. (Scroll down below to see how)
If you are on Wordpress, WooCommerce or another CRM you can use their plugins to set it up similarly to Shopify. (More documentation can be found here)
If you have a custom site you can use something like Zapier to pass data, but there is a cost to it. You can also hard code/have a dev person set this up on your server. If you fall into this option we would recommend holding until after Q4 as this can take up to two weeks to fully test the customization. (More documentation can be found here)
How to set up the Shopify Integration:
Step 1: From the home screen of your Shopify store, click on the applications tab and install the new Facebook Sales Channel Application.

Step 2: You will be prompted to enter your individual Facebook user login information in order to proceed. We highly recommend that if you are an agency trying to implement this for a client that you at least have them do this step. If your agency and the client are to ever part ways and you are removed from the app, it will undo all connectivity of the CAPI & Pixel installation.

Step 3: Shopify will confirm that you want to bring Facebook into the Shopify platform.

Step 4: in this step, you will want to verify each of the assets that you are bringing into Shopify through the Facebook sales channel app. If you or your client manages multiple assets, select through each asset drop down to ensure the correct asset has been selected.
Note: Ensure that the Automatic Advanced Matching is turned on. This will save you steps later on and ensures Shopify is passing all relevant customer data to Facebook for user match purposes.
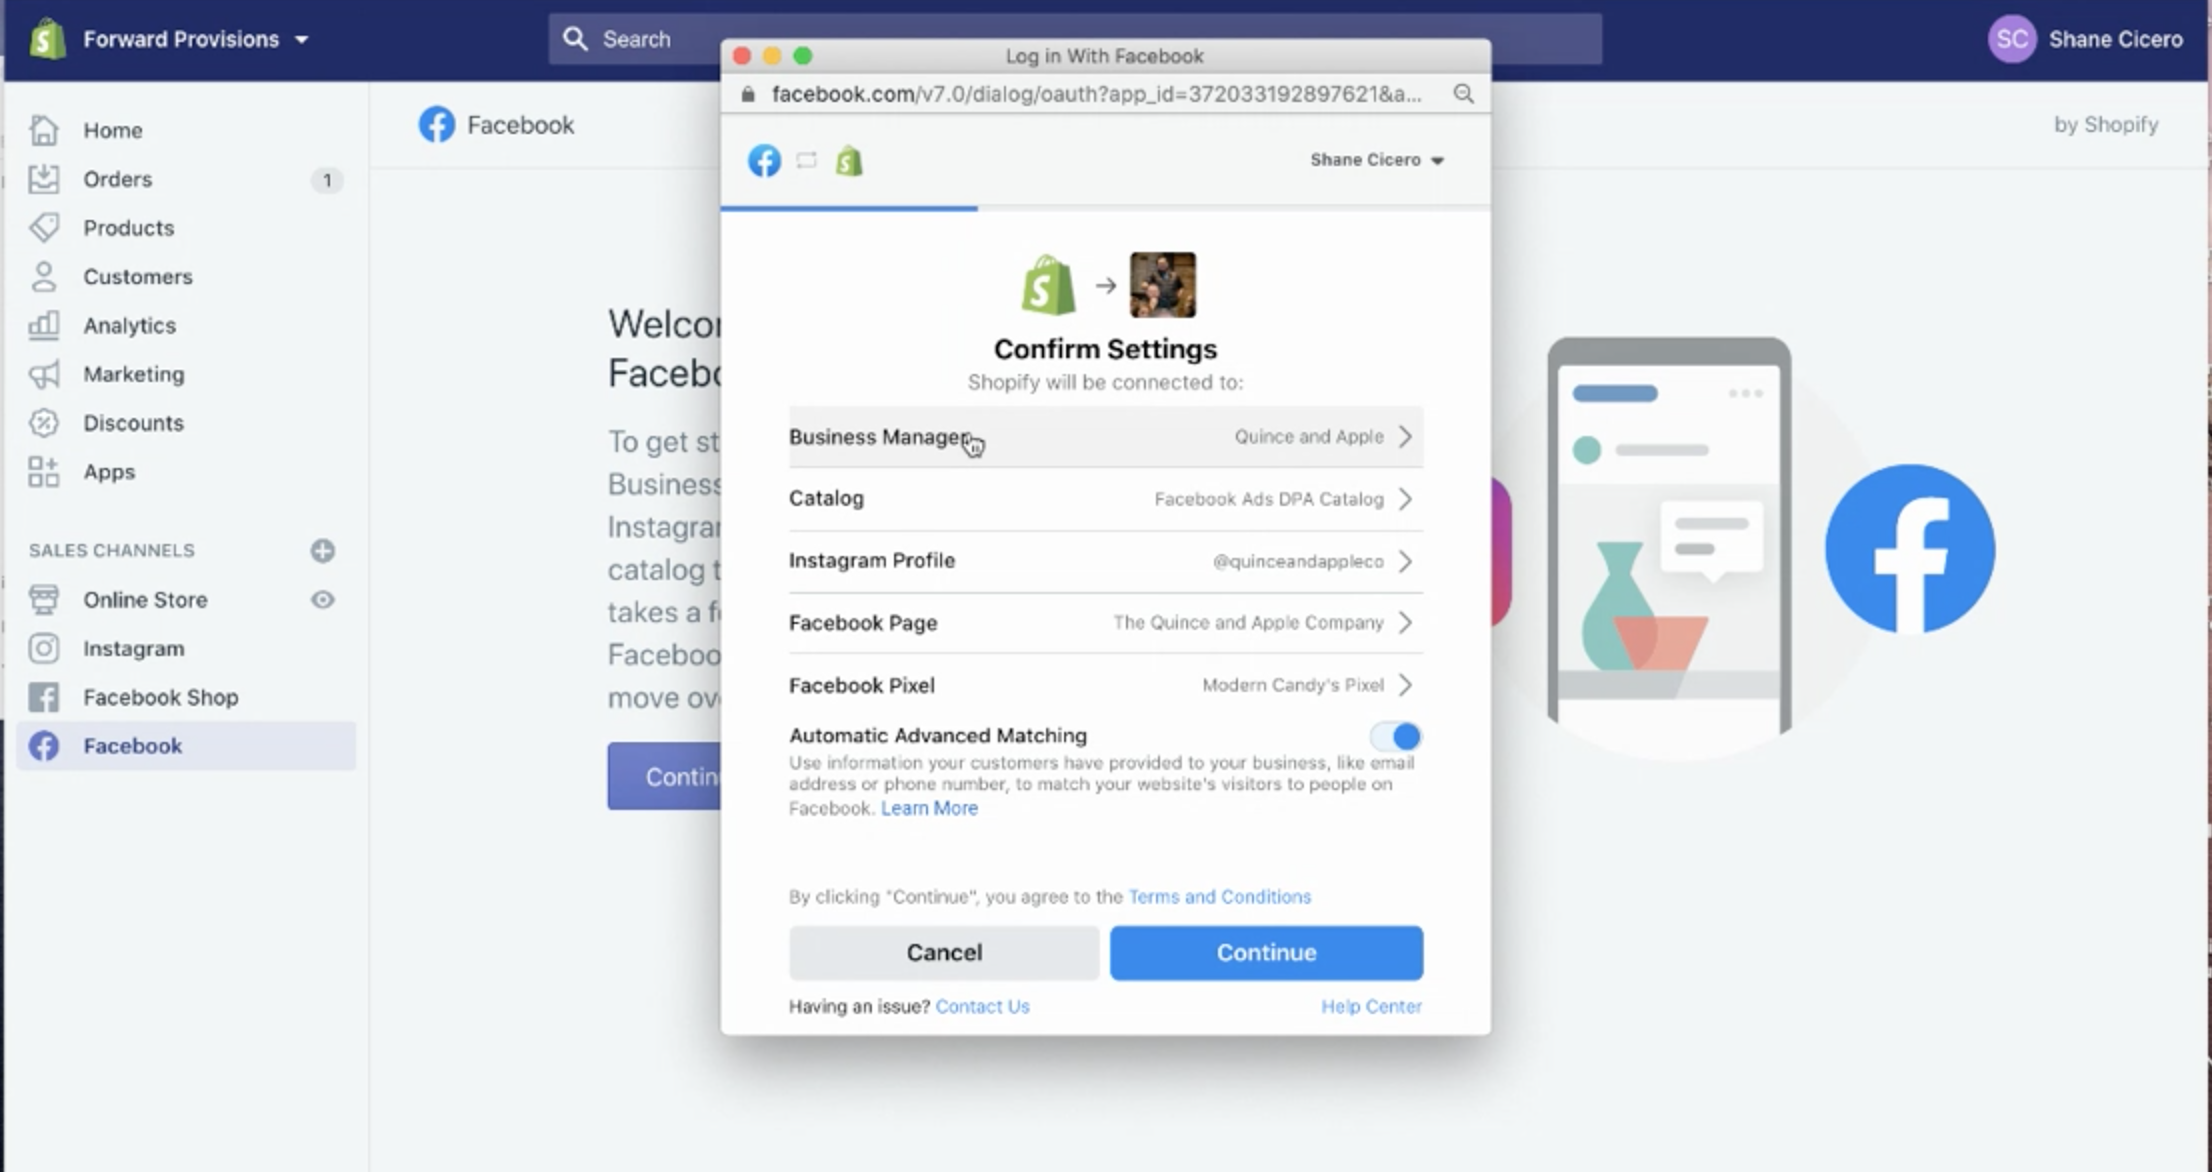
Step 5: In this step, go through and decide which functions and features Shopify will have access to. In this instance we have all functionality turned on to allow us to manage FB account activity right within the Shopify platform. This is also relevant in order to set up Facebook & Instagram Shops later on.

Step 6: Once the Facebook Sales Channel App has completed set up, hop on over to settings. From here we will then proceed to the data settings where we can enable CAPI.


Step 7: Once you are in the data sharing setting, we will need to verify 3 things:
Ensure that tracking is enabled.
Select Maximum as it combines all data-tracking options and initiates the Conversion API.
Confirm is that the correct pixel is connected within the app. If this is not your pixel, you can disconnect it and it will prompt you to connect the correct one.
Note: Once these pieces are confirmed, you may notice that the purple confirm button is still greyed out. If this is the case, you will need to go to the Commerce settings in the middle column to accept Facebook’s commerce terms and conditions. Once done you should be able to proceed with confirming the data sharing settings.

Step 8: Once this has been activated and confirmed – you are all set! You will, however, need to return to the home screen and click on the Shopify Preferences tab (this is where the Universal Pixel ID is placed). Remove it and save the settings.
Note: if you originally hardcoded the Facebook pixel into your Shopify site, it is at this time you will want to remove that code from all applicable liquid or theme pages. Not doing so will cause events to be double counted.

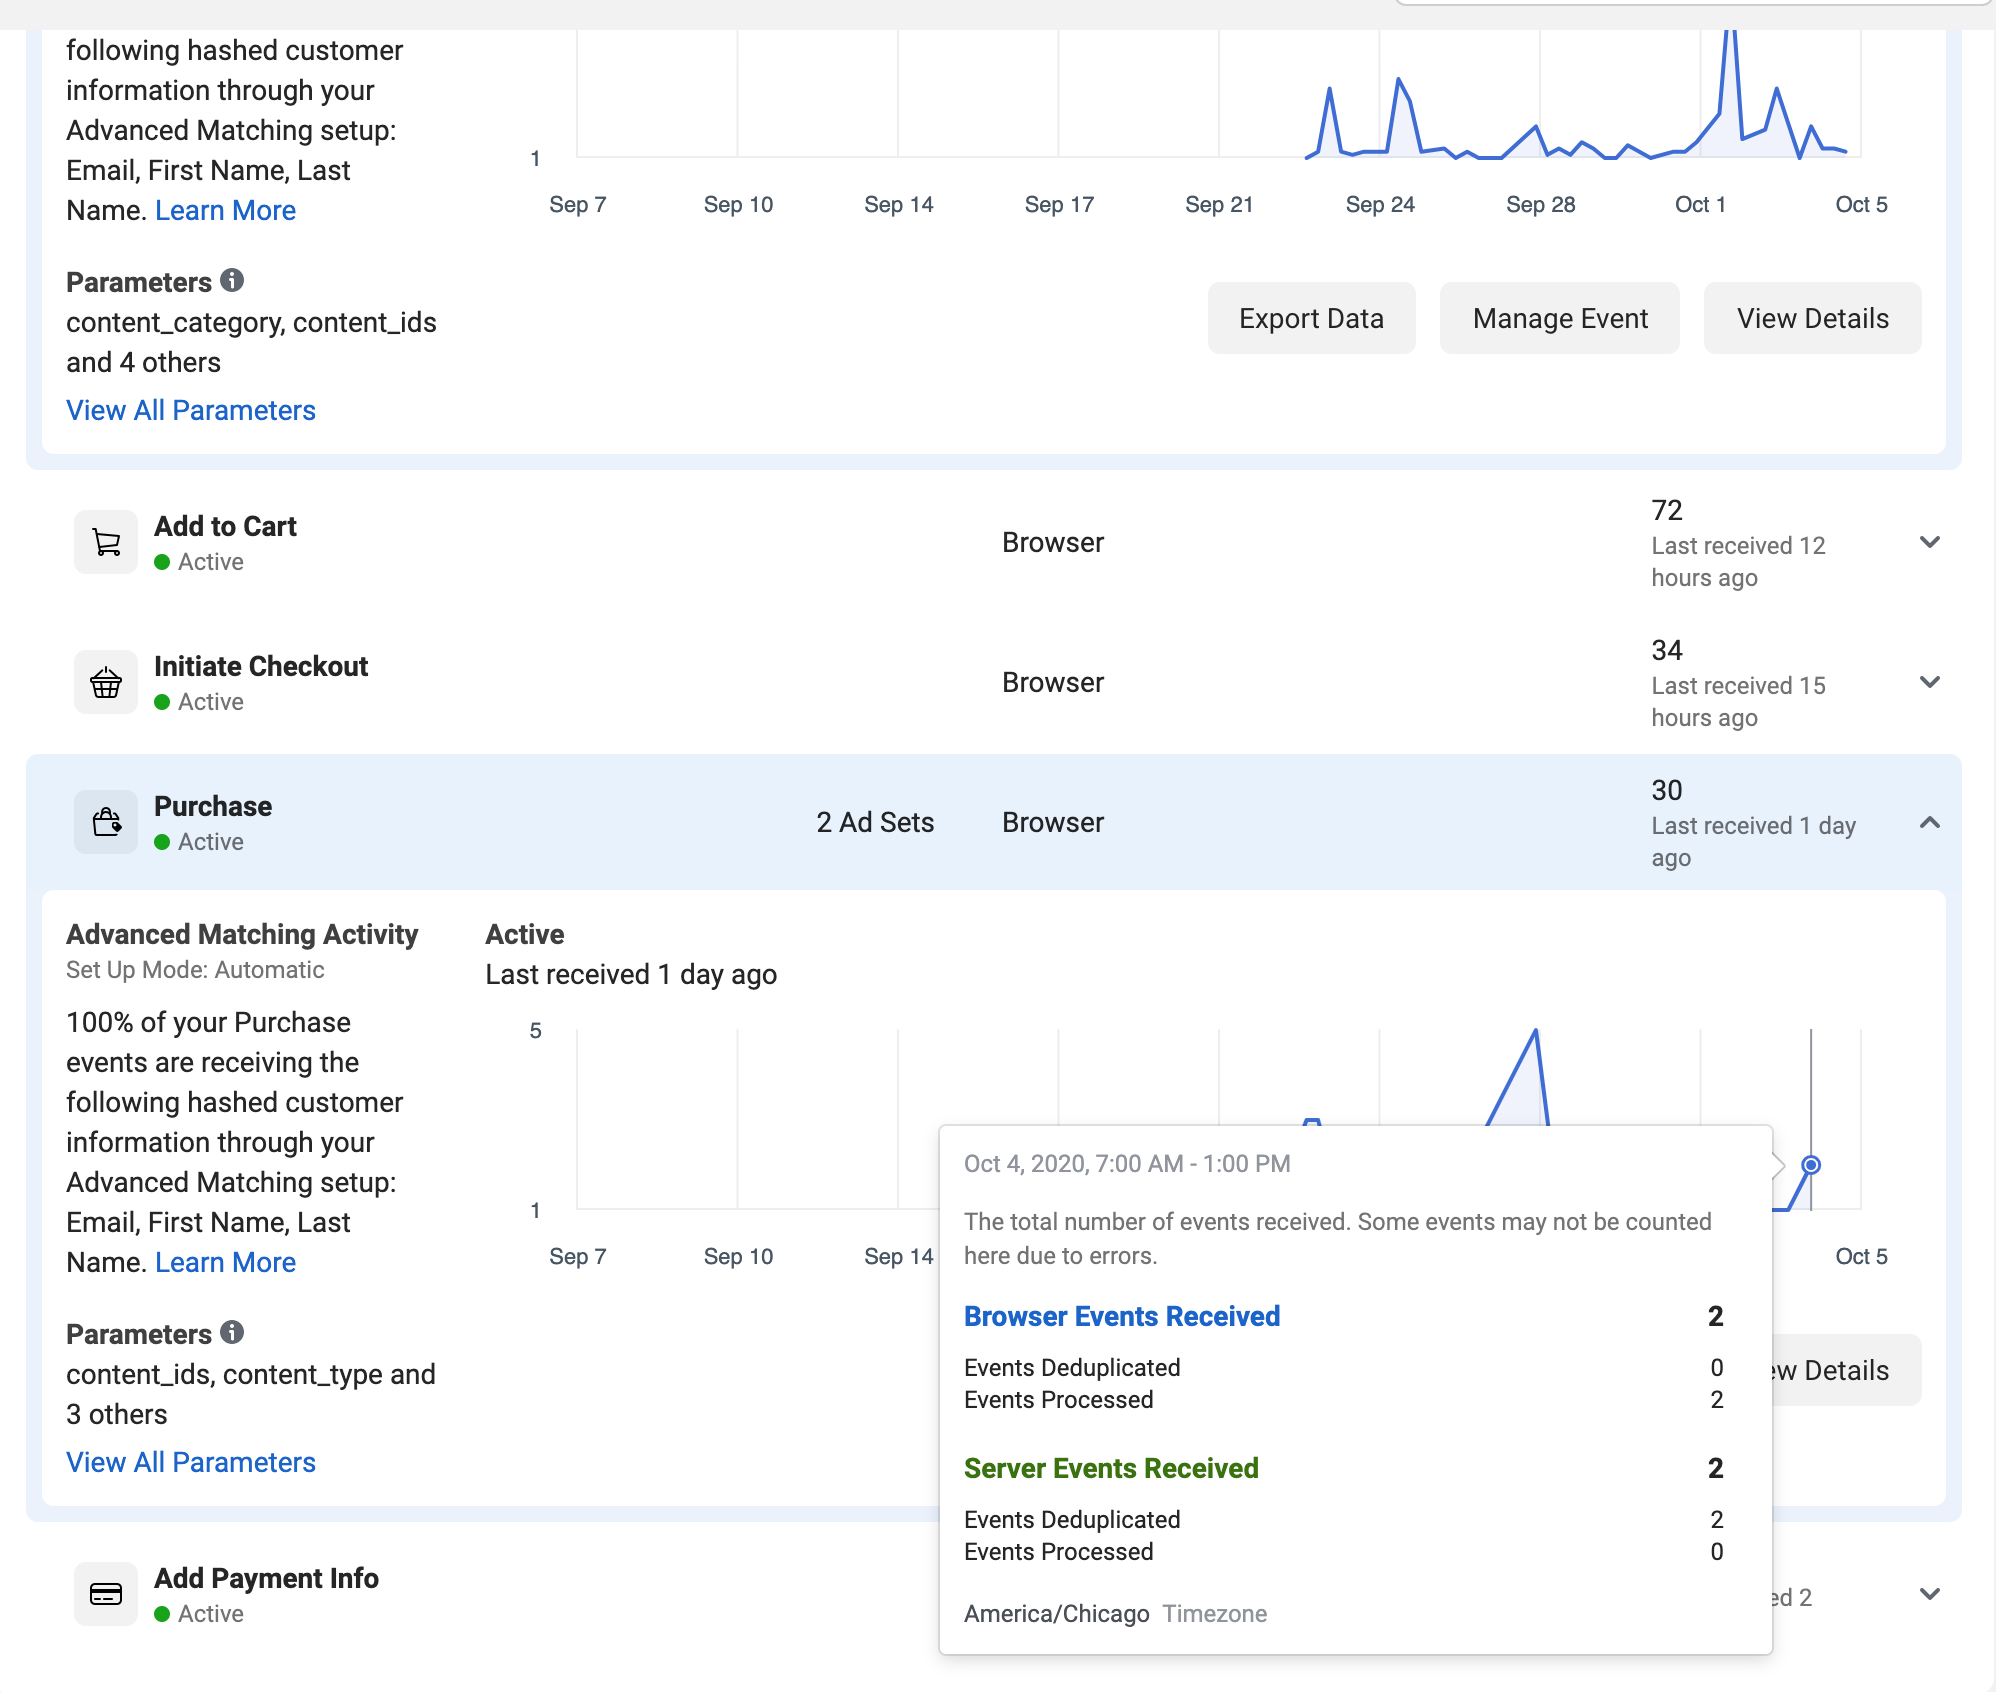
Step 9: Finally, test to ensure that browser events are properly firing on your site. Note that currently we have only seen add to cart and purchase events firing from the server side and understand more of these events will become available over time as sites need to depend more on server side data to be passed to FB.
You can use the Payload Helper Tool to test these events. Be sure to select the type of event you want to test (Purchase, Add to Cart, etc.) and to place your pixel id in the designated spot before launching the test. Once the test is fired it will open a new window tab and will take you to the test events screen within your Business Manager account. You can then also head to the Event Overview tab and select a specific event to see if the Server Side is sending/deduping matched events.


Nice work – you made it to the end! Thanks for reading along. If you have any questions or seem to get stuck at any point along the way, please do not hesitate to reach out: